| Turn 0 | Actions |
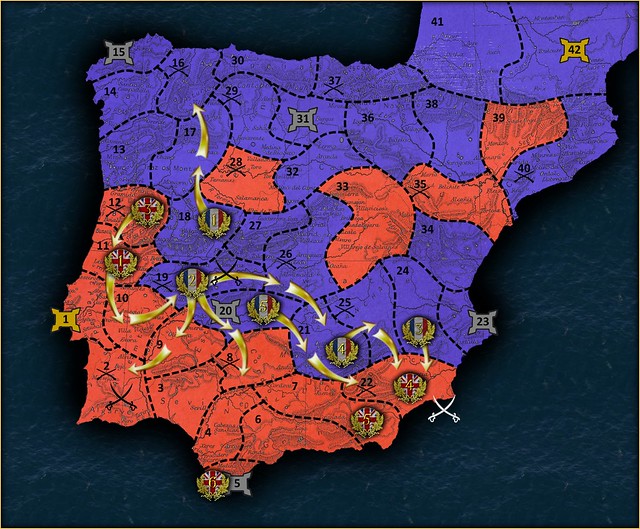
 | Next week being the first turn of our Campaign in the Peninsular, both the Allies and France commit 3 Army Corps to the field. The forces participating amount to some 232 companies (ie.players), 3,153 men & horses (incl.bots) or 29,360 men & horses (historical scale, ie: x10!).
The year is 1811 and after a series of unsuccessful french offensives into Portugal the field of play has begun to balance...
The allied I Corps under Field Marshal Wolffe guards the entrance to northern Portugal at La Coruna, consisting of a two British & one Scotch division. Their II Corps is staitioned at Lisbon behind the lines of Torres Vedras, preparing to drive into Spain and consists of two fresh divisions of the Kings German Legion under Field Marshal Lightning. In Support of their Allies the Spanish under Field Marshal Valorios have mustered a strong III corps of three Divisions, to harass the south from Cadiz and Gibraltar.
The French I Corps under Field Marshal Aleko holds a position of strength at Burgos Castle, poised to strike in northern Spain and Portugal. Recently mustered in France, Field Marshal Spoons' II Corps is staitoned at Tolouse and must move quickly to match the Allied Presence in Spain. The final French III Corps guards their southern and eastern territory, with two divisions under Field Marshal Aggofan.
Despite their inital situation France still maintains a formidable presence in the Peninsular, with the fortified city of Badajoz still in their hands. The Allies will have to act quickly to take territory before the French II Corps has time to even the balance in Central Spain. Breakthroughs in either the South or North could also be critical to success for both the French and the Allies.
|
|
|
| Turn 1 | Actions |
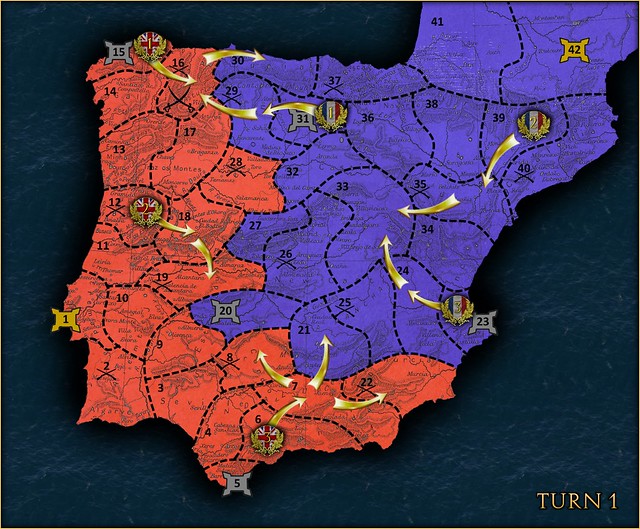 | UK Retreat to 15, Coruna
16, Lugo 10th June 1811...
The French I Corps under Field Marshal Aleko confronts the British I Corps under field Marshal Wolffe, at Lugo in northern Spain. The british have ample time to prepare, constructing a formidable defense amonst a range of hills overlooking two plains. The french troops consist of some 5,100 men and deploy heavily on the british left, with a comparitively small contingent of their troops to hold the right in place until their troops can break through to assist them. The british troops on the field number at around 3,200 men and horses, with one battalion of the 32nd foot marching to assist. Their troops who are present deploy fairly evenly with a slight superiority to their right flank.
Battle commences around midday with excellent visibility and with the french troops on the left immediately moving on to the offensive, putting pressure on the fragile british defence there. On the right opposing sides number evenly and both sides seem hesistant to engage fully - the stalemate only changes when the 32nd arrive on the british right, giving them a decent superiority in numebers to quit their defences and destory the french troops in front of them. Unfortunately in the time taken for their reinforcments to arrive the british left defended by the 54th is overpowered and routed... The odds soon turn against the troops on the british right, as victorious french from the other flank join the fray - having taken only minimal casualties. The british, now in a precarious position having mostly left their defenses in the hills have no choice but to call a retreat, the troops of the garrison and a squadron of Scots greys forming a rear-guard for the retreating troops of the 92nd and 32nd.
The French miraculously suffered no significant casualties, with reinforcments arriving to the pressed troops on the right flank in the nick of time. The remaining british re-group and retreat to La Coruna in hopes they may be able to hold off the victorious French I corps behind the cities fortified walls... |
|
|
| Turn 2 | Actions |
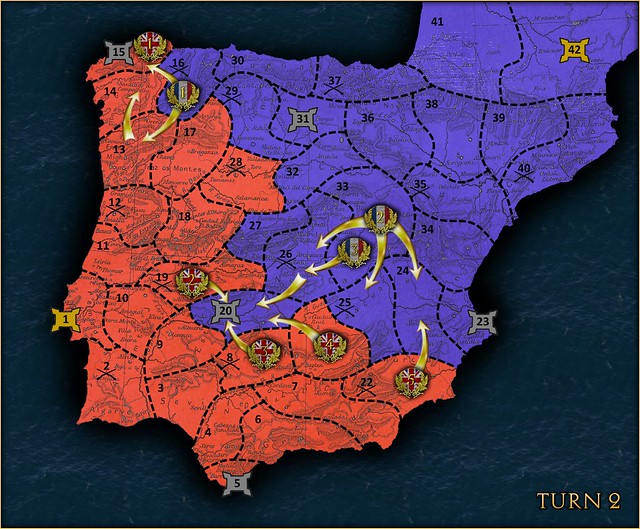 | France Captures Coruna
15, Coruna 17th June 1811...
Pushing on from their victory in Lugo, Marshal Aleko's I Corps arrives at Coruna with some 4,000 men to take the fortifications and gain entrance to Portugal. Marshal Wolffe having lost 1st Dvision stands with the remainder of the allied I Corps, numbering 2,600 troops fit to fight and defend the walls. The french can also rely on a further 2,000 troops who have moved south to secure territory, to reinforce them if need be.
The British hold a key strategic fotifiaction just outside of the city, ready to defend to the last man.
Battle commences at midday with high visibility for the british gunners; the french troops consisitng entirely of infantry disperse themselves as much as they can upon their approach to envelop the defenders, coming across difficult terrain to the east and west causing some delays for the troops on the flanks (rip meshing). Their forces in the center however hit home early on and take shelter from the enemy musketry beneath walls, awaiting their other troops to come up before attempting escalade. These troops endure this punishment well, surviving long enough for the remainder of their comrades to come to bear - all at once they attempt their escalade via four ladders dispersed around the fortifciations.
The british troops begin to give ground slowly, making the french fight for every inch of wall, until finally making a last stand at the rear walls and courtyard.
The French comitted their battalions evenly and effectively, preventing disastrous casualties. All remaining british troops in Coruna surrender to the victorious french I Corps, who are now poised to press on into northern Portugal...
France defends 20, Badajoz
20, Badajoz 16th June 1811...
Closing in from all sides, the fortified city of Badajoz is besieged by two full strength Allied corps of two divisions each - one british and the other Spanish under Field Marshals Lightning and Valorios. Just before the siege is put in place, Marshal Aggofan with his French III Corps moves in to the city along with elements of II corps, anticipating the Allied offensive.
The Allied troops besieging the city number around 11,000 men and horses, including three full batteries of artillery; with these pieces they swifty create three breaches along varied points of the fortifications through which their troops can storm the city. The attacks will be made on three sieges; the west through a forsted area, plains to the south and across streams to the east.
The french troops consist of some 6,400 men and deploy to match the attackers movements at each breach. The defenders anticipate reinforcments arriving from Madrid under Marshal Spoons, bringing with him the remainder of II Corps 2nd divison and a further 1,800 men.
Battle commences at midday and with the allied troops engaging the wall fiercly on all fronts. The 1st Division of the Kings German Legion attacking across the plains from the south storm the breach confidently, assured of reinforcments from III Corps 2nd division - these troops however never reach the field. The outnumbered german troops push on bravely but are eventually overwhelmed at the summit of the breach and routed.
At the same time both Eastern and western attacks start to make headway, pushing the breaches forcefully and making their way up on to the walls of the city. The successful defenders of the southern ramparts make their way to the west to support the defenders, eventually beating back the 2nd division of KGL.
The outcome of the battle is now at its most uncertain point, with two of the ramparts successfuly defenders but the last being truly fragile; The 1st Spanish division taking a more carefuly approach have successfully conquered the wall and begin pressing into the city. The defenders prevent them from reaching the courtyard long enough however for some final reinforcments of the 56e from the French III Corps arrive and take heavy losses to finally oust the spanish troops from the final breach.
Both sides suffered huge casualties, with promised reinforcments failing to arrive to both the attackers and defenders. As a result however many of the divisions taking part regroup with fresh battalions that were not involved in the action, the allies retreating to their respective territories and the french left to lick their wounds behind the walls of Badajoz.
France retreat to 25, Valencia
24, Albecete 17th June 1811...
East of the besieged city of Badajoz the 3rd Division of the allied III Corps attempts a flanking manouver to reach the city of Valencia, they are however intercepted by elements of the french II Corp's 1st Division.
The french troops hold a fortified position on a river bank with some 1,500 men, awaiting a further 1,300 troops of 1st Division under Genenral Tylerus to assist them.
The british troops on the field number at around 2,300 men and horses under General Kepa, poised to drive across the river before the french reinforcments arrive.
Battle commences around midday, with the Spanish troops positioning the bulk of their troops on the french right with their cavalry concealed on the left; the french in contrast bulk themselves together in the rear of the defenses, relinquishing control of their forward trenches in the village immediately.
The Spanish infantry and artillery waste no time in taking advantage of the situation and push the french right by crossing both the ford and central bridge. The french troops have no choice but to submit their cavalry to occupy the spanish infantry as their reinforcments make their way on to the field barely 200 yards from where the spanish are deployed...
Now with renewed vigour both french infantry battalions push the spanish infantry and artillery inflicting almost fatal casualties, however the spanish troops quickly recognise the danger and begin to retreat in good order. Meanwhile with most of the french cavalry strength spent and their infantry having quit their defensive position, the spanish cavalry sweep in from the left and annihlate the french artillery.
The odds are now incredibly close for the remaining troops on both sides; the remaining french troops positioned between the fragile remainder of spanish infantry and artillery and a more significant contingent of heavy cavalry to their rear. Cutting their losses the remaining french choose to retreat.
The Spanish miraculously suffered only minimal casualties, with their infantry and artillery retiring at just the right time for their cavalry to come to bear. The remaining French troops change their route of retreat towards Valencia to protect their lines of communication. |
|
|
| Turn 3 | Actions |
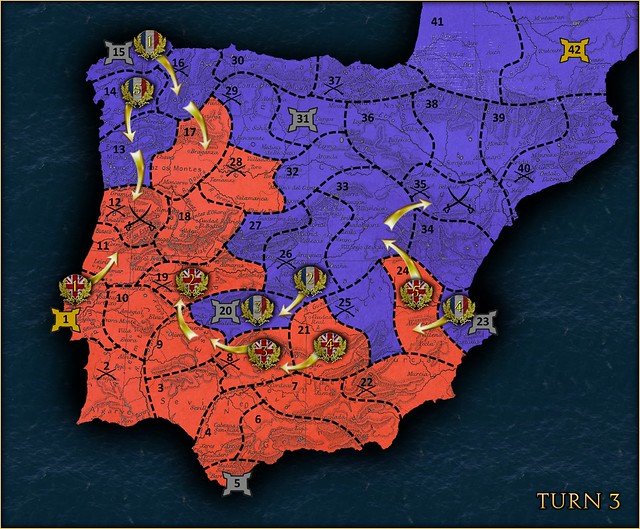 | UK Surrender 12, Viseu
35, Tarragona 24th June 1811...
Spurred on by their breakthrough in the east, General Kepa's 3rd division of the allied III Corps pressed on into spain - moving through Cuenca and into Tarrogona, where they finally reach some resistance.
The French Garrison consist of around 1,200 men and have no choice but to make a stand on an open plain, to obstruct the Spanish advance; they construct a defensive redoubt, central in the plain to suit their small force.
The Spanish troops under General Kepa number at around 1,700 men and is comprised largely of infantry, a formidable force to pressing on into relatively undefended french territory.
Battle commences around midday with the Spanish forces dispersing themselves widely across the plain, with their artillery stationed on the french left. The french troops focus their infantry around the trench systems on their right flank, cavalry on their left and artillery on a central hill.
The Spanish Line advances as one all along the line with their artillery limbered and moving to support on the french left, looking to take a significant piece of high ground from which to shell the french centre. The french choose to abandon their left, their cavalry quitting the position and moving quickly round to the right; in turn the french infantry stationed on the right concentrate with their cavalry and push hard, routing one spanish battalion there whilst sustaining some losses.
The Spanish troops in the mean time occupy the hill on the left and dig-in to shell the french position, the artillery of which are now fairly isolated. The immediate danger quickly ends however with the return of their infantry and cavalry from the right. A stalemate now ensues with neither side seeming to gain the upper hand...
After a prolonged duel between either sides batteries the french eventually manage to knockout one of the spanish guns, prompting the spanish infantry to push forward and close with the remaining french garrison; numbers win the day and the Spanish Line and Grenadiers drive the french from their defenses.
By Nightfall all french troops from the garrison had fled or surrendered. The Spanish victory was total but costly, losing one battalion of infantry and their artillery; they have now however carved a deep path into french occupied Spain and still mantain two battalions of infantry with which to push on. |
|
|
| Turn 4 | Actions |
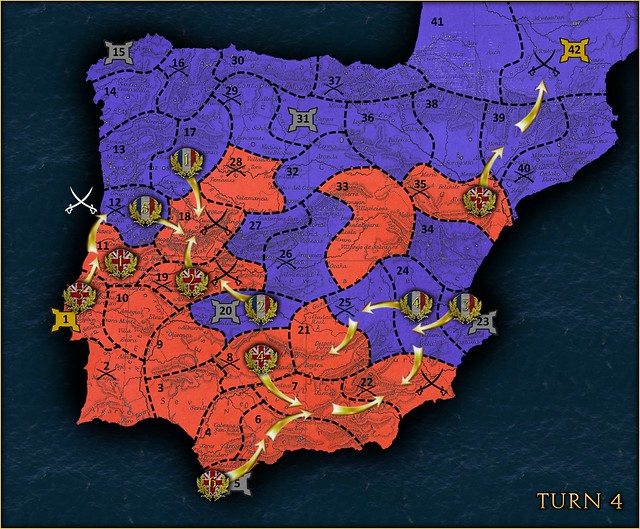 | France Surrender 12, Viseu
UK Retreat from 18, North Caceres
UK Surrender from 19, South Caceres
France Retreat from 22, Murcia
42, Toulouse 1st July 1811...
General Kepa's 3rd division of the allied III Corps continue to press on in the absence of French forces, crossing the Pyrenees and reaching a key fortification on the French border near Toulouse.
The French Garrison consists of some 1,200 men, including a balanced force of foot, horse and artillery.
The Spanish troops have sustained steady losses since their breakthrough in eastern Spain, now only fielding some 1,100 Infantry with which they hope to take the fort by escalade.
The Spanish plan a sudden attack after nightfall, counting on the low visibility to conceal their advance; their Cazadores equipped with siege ladders read themselves to escalade the walls on the French right whilst their main body of infantry and grenadiers mass in the centre. The French troops disperse themselves evenly along the wall, with their artillerymen and a small contingent of infantry guarding the gateway.
The Spanish Line advances as one line, disguising their intentions of attack up to the last possible second. Upon nearing the wall and starting to take enemy fire the Cazadores break away to attack the French right, hurriedly putting up their ladders whilst the remaining Spanish rush the gateway.
The attack on the wall distracts most of the French infantry as half the Spanish troops rush through the gateway; a French gun stationed there misfires unexpectedly, killing French and Spanish troops alike and adding to the panic. Hoping to avoid the French cuirassiers in the courtyard the victorious Spanish immediately leave the gate and move up the steps on to the wall to attack the French infantry already occupied fending off the ladders; one company bravely defends the stairwell long enough for the Cazadores attacking up the ladders to be routed.
The situation for the French troops now appears desperate as the remaining French infantry on the wall are suddenly outnumbered by Spanish grenadiers attacking along the wall from the gateway; the French extricate themselves along the wall and down into the courtyard, closely followed by the Spanish who once off the walls charge with bayonets. The fresh cuirassier squadron is at hand however and is free to engage the troops that have now quite the safety of the walls; after a bitter struggle the French troops gain the upper hand and rout the remaining Spanish grenadiers.
The defence was costly for the French but absolutely necessary to deny the allies territory on French soil. The surviving Spanish no longer have the strength to offer resistance and retreat over the Pyrenees and back into Spain. |
|
|
| Turn 5 | Actions |
 | The Allies Surrender to the French in the Peninsular... |
|
|
 |
Final Points:
Thankyou to the entire attendance for contributing their time to the campaign; it has achieved essentially what we set out to do which was a test run of the rules and format of the event.
We will hopefully be hosting another one at the start of September to start afresh with amended rules and a New campaign map: Italy 1796!
Do get in touch if you took part and would like certain rules looked at or amended before then and we can get everything ironed out; I'll also be posting another Sign-up thread soon to allow newcomers and those who attended this to pick their regiments & classes again  Cheers all! Cheers all!
Well played France!!
|